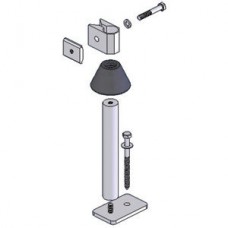
Typically, standoffs are used for installations on tile, shake, or special thick composition roof types. As a general rule, standoffs should be approximately 2½ inches taller than the cone of the flashing selected for the roof type.
The location of attachment points for standoff mounts depends on the orientation of the modules relative to the rafters. Using the array layout plans and the estimated rafter locations, determine the location of all attachment points and mark the holes for each standoff base.
SnapNrack Standoff Installation:
Remove the tile or shake underneath each standoff location, exposing the roofing underlayment. Transcribe the location marks from the roofing material to the roofing underlayment. Ensure that the standoff base lies flat on the underlayment, but remove no more material than required for the flashing to be installed properly. Use the standoff base as a template to mark lag-bolt hole locations on underlayment above the center of the rafters.
Drill pilot holes
Confirm the location of the rafters by drilling pilot holes into the roof at each of the identified attachment points with a 3/16-inch pilot drill. Be sure to drill the hole deep enough to penetrate the roof decking and enter the rafter by 1 inch to 1½ inch. If the drill pushes through at this point, you have likely missed a rafter and should move ½ inch laterally toward where you estimate the rafter to be and try again.
Secure the base
Prior to securing the base to the roof, insert the 5/16-inch x 1-inch bolt and lock washer through the tapped hole in the standoff base and tighten. Make certain you use the correct part for the type of roof on which you are installing the array. Apply a bead of sealant to the underside of the standoff base and into the pilot hole.
Secure base to the roof by screwing 5/16-inch lag bolts with lag bolt washers into the pilot holes and tightening with a ½-inch socket and socket adapter bit in a power driver. Make sure the lag bolts used are long enough to embed a minimum of 2 inches into the rafter to secure the standoff base to the roof. If the bolt spins out, you didn't hit a rafter. Move ½ inch laterally toward where you estimate the rafter to be and try again starting with a new pilot hole. Most wooden rafters are only 1.625 inches thick, so you should always attempt to hit a wooden rafter in the center if possible.
Attach standoff and install flashing
Screw standoff shaft onto the base and tighten. Install flashing over the standoff shaft and base using standard building practices. Apply a bead of sealant to seal the top of the flashing around the standoff shaft. Slide rubber rain collar over the standoff and press down to cover the sealant at the top of the flashing. Every standoff must be firmly secured to a rafter to ensure system integrity. Make sure that all lag screws are securely tightened into roof rafters and are structurally sound.
Flashings not included
SnapNrack Standoff Kit, 5.5", Clear, 1 pc
- Brand: SnapNrack
- Product Code: SSK5-5C-1PC
- Availability: In Stock
-
$11.15
Related Products
SnapNrack Critter Guard, Array Edge Screen Kit, Clips 100 ft x 8 in
Available OptionsSnapNrack Critter Guard, Array Edge Screen Kit, CLIPS ONLY, 8 inch, Sold Individual..
$244.93
SnapNrack Flashed L-foot kit, Clear, 12 pc.
SnapNrack Flashed L-foot kit, Clear, 12 pc. Typically, using flashed L-feet to mount PV modules enab..
$136.03
SnapNrack Splice R2 Kit, Black, 1 count
SnapNrack Black Rail Splice Kit, 1 count. At every junction of two rails, snap or slide in a rail sp..
$14.16


